Recipe: Snoop Dogg’s Fried Chicken

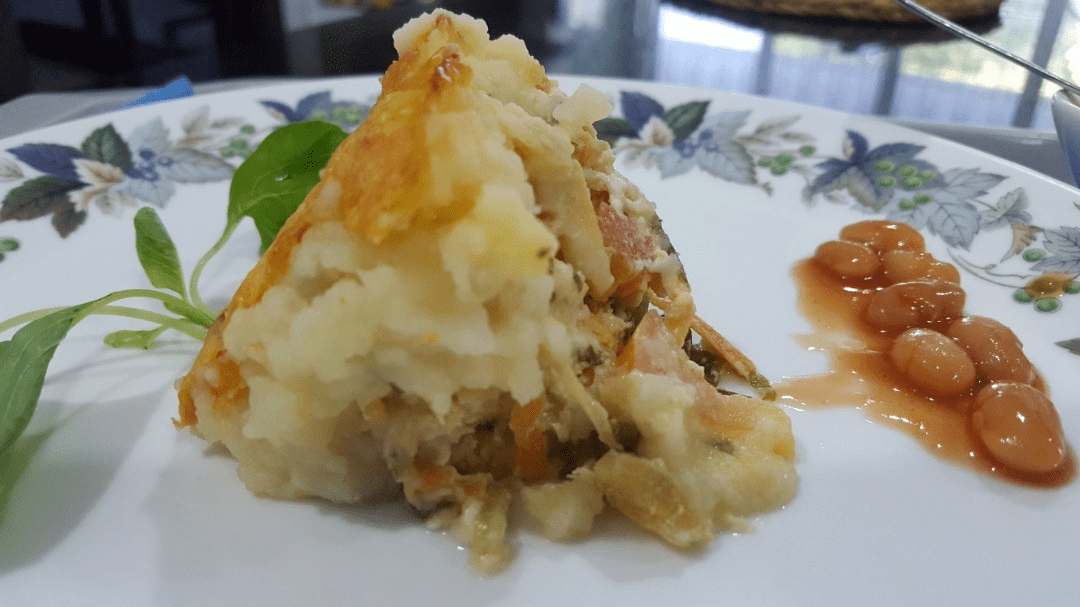
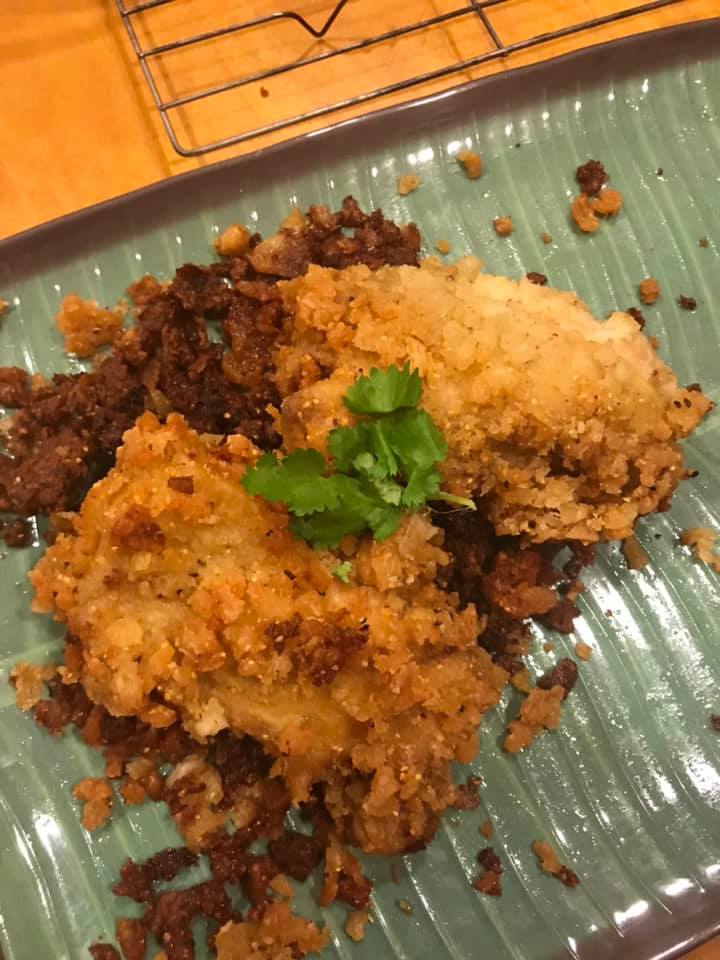
Yesterday as part of my MCO cooking adventures, I decided to try out a recipe from Snoop Dogg, a veteran rapper and plant specialist. Given his interest in the colour green, I’d imagine that he would have a knack for food that can help with the munchies. In the end, I would say this is one of the best chicken I’ve ever had!

Compared to the original recipe, I changed out the all purpose floor for rice flour and it turned out pretty well. However, I feel that the brined chicken was better as is before being fried. I might use the brine again for a roast or grilled chicken.

Ingredients:

For the Brine:

2 Orange Peels

2 Bay Leaves

Chilli Flakes

2 tbsp Granulated Sugar

2 tbsp Salt

For the batter:

2 cups of rice flour (original recipe uses all-purpose flour but MCO said no)

0.25 cup of corn meal

A crushed bag of Lays Salt & Vinegar

2 tsp of Garlic Powder

1 tsp Cayenne Pepper

0.5 tsp Baking Powder

2 tsp cracked black pepper

2 tsp of salt (I think you can use less if you are using a salt heavy bag of chips)

Buttermilk

Chicken: My recipe managed to prep around 10 chicken wings/boneless thighs. So, you’d want at LEAST that much on hand.

1 Quart of Conola Oil (For frying)

Instructions:

  1. Bring to boil a pot of 5 cups of water. Then, put your BRINE ingredients into the pot and let it stew for a few minutes.
  2. Let the brine cool down before putting in your chickens. (Tip: If your chicken is frozen and your brine doesn’t scald you, feel free to put the frozen chicken in to cool down the brine)
  3. Once the chickens are in the brine, refrigerate for 8 hours (minimum). 24 hours is best.
  4. Once the chickens have sat in their juices for a while, prepare your dry batter mix by mixing all the dry ingredients for the batter in one bowl. Then, pour the buttermilk in another bowl.
  5. Pull your chickens out of the brine and pat them dry.
  6. Bring a pot of oil to a boil.
  7. While waiting for the boiling pot, dip your chicken in buttermilk and pull it out. Let it drip a bit before putting it into your dry mix. Roll it around, make sure it coats the chicken. Then, place the coated chicken into a pan or dry rack.
  8. Repeat the process for each piece of chicken. Then, let them dry for 10-20 minutes.
  9. Now, your oil is boiled, start frying! Depending on the heat, your chicken might take longer to cook. What to look out for is browning. When the fried chicken starts looking like fried chicken then it is probably cooked. If unsure, take out a test batch and make an incision. If it isn’t cooked through, toss it back in. Else, you have just been made aware of how long to cook the chicken! For me, it took me 10 minutes per chicken piece.
  10. Serve with hot sauce or tomato sauce!

Recipe: Moroccan Spiced Leg of Lamb

Today, as part of my Movement Control Order activity, I decided to make a Moroccan Spiced Leg of Lamb. This is loosely based on Gordon Ramsay’s recipe which was transcribed onto this imgur album.

I made a few mistakes when making it but they were pleasant mistakes. Due to this, my recipe differs slightly from the one in the above album.

Ingredients:

Lamb – Leg (I used around 2KG)

Spices:

  • 2 tbsp Turmeric Powder
  • 2 tbsp Smoked Paprika
  • 2 tbsp Cayenne Pepper
  • 2 tbsp Ground Cinnamon
  • A pinch of Pink Himalayan Salt
  • A few sprinkles of Cracked Black Peppercorns
  • Dried Thyme
  • Olive Oil
  • Honey

Root Vegetable Pairings:

  • 3 Potatoes
  • 2 Carrots
  • Olive Oil
  • A sprinkle of Dried Thyme
  • 2 Bay Leaves
  • 2 Cloves of Garlic

Instructions:

  1. Preheat oven to 200C.
  2. Mix all the spice blend ingredients together in a large bowl. Add the olive oil and honey last. What you get will be a paste of sorts (ref above).
  3. Make some incisions with a sharp knife in the thickest parts of the lamb. If you have cinnamon sticks (which I didn’t have), you can put them in these holes.
  4. While letting the lamb marinate in the paste, prepare the vegetables. Peel and cut the potatoes and carrots into small pieces.
  5. Mix them with olive oil, garlic and bay leaves.
  6. Place them at the bottom of your baking dish of choice. (Make sure it is big enough to fit the lamb!)
  7. Place the marinated lamb on top of the vegetable ensemble.
  8. Sprinkle a bit of thyme on top for that extra crisp.
  9. Cover with tin foil and put in the oven for 45 minutes.
  10. Check on it to make sure it is cooked. If not, keep putting it back in with 15-minute intervals. To know if it is cooked, make a small but deep incision to the bone and look at the colour. Dark purple or too pink means it could use more time in the oven. A little bit of pink is alright. Think of it like a rare steak.
  11. When the lamb is pretty much cooked through, take off the tin foil. Turn the oven from Bake to Roast and char that leg until some of the vegetables develop a bit of blackness to it. Be careful not to burn!
  12. Now, let the leg sit for about 10-15 minutes and start carving your way through it.
  13. Serve with Mint Jelly or Mustard.

Review: Fittie Sense at Telawi

Nestled away among the bustling shop lots of Jalan Telawi 3, Fittie Sense is a healthy hidden treasure compared to the sinful eateries on the ground level.

The interior of the restaurant is very cozy and homely. A translucent roof makes for a great source of natural light during the day. Upon visiting this lovely little nom-station, you would see the patrons are the young and hip people of society. So, if you feel that you are young in body or mind, you’d fit right in!

Cauliflower Rice

My food of choice this time around was the Beef Rendang with Cauliflower Rice.

Eating this dish was a culinary experience on its own as each individual part was not the best tasting. The cauliflower rice tasted very raw on its own. On the other hand, the Beef Rendang was too aromatic and tasted too much of spice (but it wasn’t too spicy).

However, what made this dish worth writing about was when I mixed the two together. Though individually, the two plates were mediocre. Combined, they became amazing. The bland, rawness of the Cauliflower Rice balanced the spice-overdose that the rendang was. In the end, it was the perfect balance of flavour and texture.

However, the dish still had room for improvements. Firstly, for the price of RM 32 for the dish, I think the beef cut should have been fattier for a better flavour/texture combination. Of course, as this was a health-conscious restaurant, I can understand the cut would be low-fat. My second recommendation would be adding some yogurt on the side. A bit of yogurt will help balance out the strong flavours of the rendang. Mixing yogurt with the cauliflower rice could also make it taste creamier.

Fittie Coffee

For my drink, I had their Fittie Coffee. It was their take on the ‘Bulletproof Coffee’. For the fat in the coffee, they used coconut oil. The coffee was well made. I felt more energetic and content after taking it.

My friend had a very interesting dish. Fittie Sense’s Zoodles are noodles made out of zucchinis. Personally, I am not fond of zucchinis so I didn’t try that dish. However, it is interesting to note that the Zoodles seemed to be raw. So, it felt like the Zoodles are more of a salad rather than a noodle dish.

Overall, I will give Fittie Sense a 7/10 ! It is a great healthy culinary experience in the heart of Bangsar. The prices are a bit high but it is sort of expected in this area. Fittie Sense is also quite good for those with gluten sensitivities as there are a lot of gluten-free options.

If you want to check them out, visit them at:

23A, Jalan Telawi 3, Bangsar, 59100 Kuala Lumpur, Wilayah Persekutuan Kuala Lumpur

Or, maybe you’d want to check out their website or their Facebook page!

Review: Waroeng Penyet @NU Sentral

Today, my girlfriend and I went to NU Sentral because it was near to a place we were planning to recce for a LARP project we are going to run in a few months.

My first impressions of the Waroeng Penyet was that it was going to be a standard fare of Indonesian fast food. Heck, fast food usually isn’t the most promising in terms of taste or health. However, upon closer inspection they had grilled options which definitely piqued my interest as they seemed healthier.

What surprised me even further was the fact that the dishes were relatively inexpensive and had an immense variety available on their small wooden plates. The grilled chicken comes with tempeh, taufu and an assorted amount of vegetables.

As I was wary of portion sizing due to my previous experience at Pigs and Wolf, I decided to order a garlic kangkung dish. Overall, with a sugar-free tea, the cost was definitely lower than expected. The size of the chicken was as expected as it was just a single thigh. However, what I did NOT expect was how big the portioning was for the kangkung. It was ginormous!

For taste, the grilled chicken was extremely well seasoned and the meat was tender enough to slip right off the bone. Overall, a very pleasant experience to eat. There were an abundance of variety sauces of various spice levels available on the side to dip your food in. Absolutely genius! As a person of the pale sort, I veered away from the spicier options but their sweet & spicy soy dip was very delicious.

The only thing I felt that was a bit too extra was the raw vegetables that came with the chicken. To me, they were decorative at best. However, this is from the opinion of a person who despises raw veggies so take this statement with the biggest grain of salt.

The kangkung was standard and as expected of a Indonesian restaurant. However, the portioning was perfect. Also, the tomatoes in the stir fry absorbed a lot of the flavour of the garlic which made them very palatable and, dare I say, delicious. (I also don’t like tomatoes).

Thus, a place that definitely deserves praise would be any place that makes me veggies that I actually enjoy shoving into my mouth.

In terms of cleanliness, it is surprisingly good. There was always a staff on hand to clear stuff. In fact, I was very happy with the customer service as they pointed out that my girlfriend dropped her phone on the ground. This is behaviour that is uncommon in Malaysia and due to this, I praise.

Overall, the eating experience was definitely above par compared to many fast food style joints around the city. If you are looking for Indonesian cuisine, I’d definitely recommend you to hit this place up. As a result, I grant this place 7/10! It is a place I recommend to try if you are in the area but as it is still just a fast food spot, I would not recommend a special visit.

Definitely check them out at their website or their Facebook page.

Leave a comment down below, if you have any favourite Indonesian cuisine in KL that you’d want me to try. Or any other restaurant.

Review: Pigs and Wolf @Pavilion KL

Pigs and Wolf is a family friendly non-halal restaurant chain. One of the outlets is in Pavilion KL. My girlfriend and I decided to pay it a visit as I was looking for something moderately healthy in the area.

Yeah, I have been trying to eat healthy for awhile now. 6 weeks in fact! Lost 9 KG so far due to the program I am on. Still got plenty of improvement to go.

Anyhoo, got a bit sidetracked there. So, I was looking for something healthy to eat in Pavilion. Then, I remembered eating at the Three Little Pigs & the Big Bad Wolf in 3 Damansara. There, I had a Butter Fish with Cauliflower Rice and that was pretty good. It was a keto-friendly dish and they had a whole range of keto-friendly meals.

What I ended up ordering was Creamy Chicken with Spinach. Meanwhile, Cheryl ordered a Keto Mummy Pig Salad.

The Creamy Chicken with Spinach was a chicken chop that was panseared then drowned in some sort of cheese cream sauce over a tiny bed of spinach. The cheese sauce was okay but not the best I’ve had as it was pretty bland. It could have used a little bit of seasoning or maybe a different set of cheeses. The spinach tasted like it was just blanched in water so was not surprised it was bland. The chicken also could have used a bit more seasoning and at some points felt a little dry in terms of texture. Next, my other complaint is the size. For RM 20, you are getting only a tiny chicken chop and most of the calories come from the sauce. I left the restaurant feeling very unsatiated even after mooching a bit of salad from my girlfriend. I do not know how I managed to eat 900 calories in that one abysmally small dish.

The Keto Mummy Pig salad was quite a towering dish, especially in comparison to the pigeon-sized chicken chop I had. The pork belly tasted okay but suffers from the same blandness the chicken had. The chili-lime oil sauce that came with it tasted more like oil than anything. I could barely taste the chili but could get some hints of lime.

Overall, I would give the food here about a 5/10. A solid meh. This is including my positive experience at the other branch. I would direct myself to other restaurants next time around and I’d recommend you to do so too if you want to have a happy, healthy and full stomach.

If you have any recommendations for any good, healthy restaurants for me to try out, feel free to leave a comment below!

If you want to check them out, go ahead and check out their Facebook.

Recipe: Carbonara Pasta

Carbonara Pasta is most likely named after a Roman restaurant and roughly translates to ‘in the manner of coal miners’. It is normal to see the carbonara pasta on menus in italian restaurants or any place that serves ‘western’ food. An obscenely easy dish to prepare, I decided to give it a shot to prepare for my mum when she was around. This recipe is loosely based off Jamie Oliver’s recipe.

Feel free to check out his rendition here:

However, I decided to some things a little different. Go ahead and try this version out!

Ingredients:

  • Leek
  • Mushroom (I used portabello, white button and some brown mushroom. It was under a 3-in-1 package)
  • Garlic
  • Onion
  • Pasta (Any kind will do. I would prefer not to do it with angel hair as it is pretty brittle)
  • Parmesan
  • Mozzarella
  • Mascarpone
  • Egg Yolks
  • Lemon Zest
  • Lemon Juice
  • Salt
  • Pepper
  • Olive Oil
  • Parma Ham (Or Bacon)
  • Butter
  • White Wine

Instructions:

  1. Chop up your leeks into 2 cm segments. Thinly slice your mushrooms. Mince your garlic and onions.
  2. Boil your pasta in salt and olive oil until al dente. When it is done, drain the pasta but reserve some pasta water. Set aside with a little drizzle of olive oil.
  3. Mix a bowl of lemon zest, juice, egg yolks, parmesan, mozzarella and mascarpone. Add some pepper for some extra heat. Reserve some of the cheeses for later.
  4. Heat some butter on a pan that can hold all your pasta.
  5. Add garlic and onions. Cook till fragrant but not burnt.
  6. Add mushrooms and leek. Cook until all the juices come out. Then, add a splash of white wine. Continue to let it cook until all liquids reduce by about 70%.
  7. Add Parma Ham and cook till lightly browned (or crispy)
  8. Add your pasta and toss it. Let it soak up all the flavours.
  9. Take your pan off heat. Add in the egg mixture and stir it all up. The reason behind taking it off heat is to ensure you get an egg sauce and not scrambled eggs.
  10. Add more cheese, pepper and salt to taste.
  11. Serve with soup or salad! Enjoy!

Review: Tono Soy Milk

This is the first food review I will be putting on this blog. A friend and I decided to pay a friend of ours a visit at this restaurant and we definitely did not regret it!

Full disclosure, I am a person who does not like to eat or drink Soy products. However, their Soy Milk drink definitely made me a convert!

I had their plain soy milk drink (as pictured). It was unsweetened which was great because I am currently on a diet so I prefer to cut down on carbohydrates where possible (Sugar namely being one of the big ones).

Their plain soy milk tasted extremely refreshing! It had a sense of sweetness to it that I know is attributed purely to the beans themselves.

So healthy!

It has no preservatives or additives. The beans are from a non-GMO source of Canadian beans. It is as pure as it gets! Also, everything is freshly prepared in a fancy Japanese machine (which is the first thing that greets you as you enter the store).

The restaurant itself follows a Japanese concept for its internal design, making it feel nice and open while maintaining a certain coziness to it. However, I would definitely appreciate more chairs with backs to them especially if I was planning to sit there for prolonged periods #badbackproblems .

Credit: @tonosoymilk

They also sell a really good tau fu fa that I sampled off my friend’s order. But then again, I am not a fan of tau fu fa so I can’t be a fair judge in that respect.

Credit: Tono Soy Milk

If you are interested, check them out! Go ahead to Uptown! You will definitely love it!

Their address is:

86G, Jalan SS 21/39, Damansara Utama, 47400 Petaling Jaya, Selangor

I’d also recommend that you go check ’em out on their Facebook or Instagram! They also have a website!

Overall, final verdict is 8 cups of soy milk out of 10!

Recipe: Fisherman’s Pie

This recipe was used when my late mother wasn’t allowed to eat her favourite meat, beef, as a way of hopefully appealing to the heavens. She wasn’t terribly fond of that but she didn’t have much say. So, I had to follow the words of the Magic: The Gathering Head Designer Mark Rosewater and say to myself that “Restrictions breed Creativity!”

So, I decided that Shepherd’s Pie would be nice what if we swapped out the meat for fish! So, like a Shepherd’s Pie, the “crust” is made of mashed potatoes!

Ingredients:

  • 1kg Potatoes
  • 1 Carrot, Peeled
  • 2 Sticks of Celery
  • A Bag of Shredded Cheddar Cheese
  • 1 Lemon
  • ½ Big Red Chili
  • 300g Salmon Fillet, deboned and deskinned
  • 425g Barramundi, deboned and deskinned (You can use any white fish meat, prawns are an option too. I couldn’t find shrimp and I am allergic to bigger prawns so I had to make do)
  • Olive Oil
  • 1 Portion of Spinach Leaves
  • 2 Tomatoes
  • Salt and Pepper to taste
  • Garlic, Minced
  • Feta Cheese

Instructions:

  1. Peel, cube and boil your potatoes in lightly salted water until tender. This should take around 10-12 minutes.
  2. In the meantime, shred your celery and carrot with the course end of a cheese grater.
  3. Shred your Chilli with the fine end of the cheese grater.
  4. Shave off some of the lemon zest.
  5. Mix all the shredded ingredients (Celery, Carrot, Chilli, Lemon Zest, Cheddar) together with some garlic.
  6. Tear apart the fish meat and mix it into the vegetable mixture.
  7. Squeeze the lemon juice (without pips or seeds) onto the mixture. Add a few globs of olive oil, salt and pepper.
  8. Mix in the Feta Cheese, Spinach and Tomatoes.
  9. Preheat your over to 200C while your pie filling sets for a bit.
  10. Mash your potatoes with butter, milk and egg yolk.
  11. Spread your mash on top of the pie filling.
  12. Apply a generous layer of cheddar cheese on top.
  13. Bake your pie for 30-45 minutes. You will know if it is cooking well if you see some boiling.
  14. Let it rest for 10 minutes.
  15. Serve with Baked Beans or Tomato Sauce. Enjoy!

Recipe: Lasagna

This lasagna recipe has been one of my most sinful but delicious dishes. Any time I make it, it is a sure favourite among my guests. As usual, I prescribe to an agak-agak method of ingredient portioning but usually following common sense is good enough!

Ingredients

Minced Meat – You can use beef, pork or chicken, depending on your palate. I prefer to have it with beef (if I want it to be heavier) or pork (if I want it a little lighter)

Olive Oil

Salt

Onion

Garlic

Carrot

Celery

Red Wine – I used a Pinot Noir but Cabernet Sauvignon or Merlot works well too

Basil (Fresh)

Oregano (Dry)

Bay Leaf – You only need 1 or 2 leaves

Canned Tomatoes

Tomato Paste (or Puree)

Flour

Butter

Milk

Cheddar

Mozzarella

Parmesan

White Pepper

Truffle Oil – This is slightly expensive but it is definitely worth it. However, if you do not have truffle oil, the dish will go fine without it.

Lasagna Sheets – Make sure you get the oven ready sheets. Don’t bother with fresh sheets. I explained further below.

Instructions:

Meat Sauce

Step 1: Lightly sear the minced meat with olive oil and some salt, browning it slightly.

Step 2: Remove the meat from the pot but leave any remaining juices in the pot.

Step 3: Then, add in onion, garlic, carrots, celeries and stir in with some more olive oil.

Step 4: Once veggies are lightly browned, throw in your meat and drown it in red wine (Be generous but don’t fill the pot with it). Let the wine reduce a bit.

Step 5: Add your basil, oregano and bay leaf and stir.

Step 6: Add your canned tomatoes and a little bit of tomato paste into the pot and stir. Let it simmer on low heat until ready for baking (or at least 45 minutes, depending on portioning, whichever comes later).

Béchamel Sauce

Step 1: Make a roux by melting some butter in a pot. Then, add flour spoonful by spoonful. When you are adding the flour, do it slowly and carefully until you have a somewhat nutty grain to the mixture.

Step 2: Add milk slowly and stir until thick. If it is too thick, add more milk; if it is too watery, add more flour.

Step 3: Add your cheeses. Cheddar, Mozzarella, Parmesan. Stir until smooth and thick. Make sure all the chunks are melted.

Step 4: Add some salt, white pepper and the secret ingredient, Truffle Oil.

Now, to combine the two

Pro tip: Make sure you are using oven ready lasagne sheets and make sure to NOT pre-boil them. Pre-boiling would lead to the sheet becoming wet and diluting some of the flavour. During the baking process, the sheets will absorb some of the sauces, giving the pasta sheet itself some flavour.

Step 1: Take both your meat sauce and béchamel sauce off the heat and prepare a large oven dish.

Step 2: Layer your lasagne in this order: Pasta, Meat sauce, béchamel sauce, parmesan. Repeat until your container is full with your meat and béchamel sauces being spread into thin layers between the sheets of pasta.

Step 3: On the final layer, put extra parmesan and douse the top with cheddar.

Step 4: Put it in the oven at around 180 Celsius and bake. Check every 10-15 minutes to see if it is cooked.

Step 5: When you are sure that your lasagne is cooked, grill the top for 5 minutes. (Open the oven door slightly to let some of the hot air come out to prevent overcooking)

Step 6: It is ready to serve. If you have extra béchamel sauce after that, you can serve it on the side by dousing it on your lasagne.

2pOeOgI.jpg
The Finished Product!

Recipe: British Scrambled Eggs

Scrambled Eggs is a dish that is deceptively easy. However, what is easy to make is also easy to screw up. There have been countless moments in my life where I have been given terrible, dry scrambled eggs. This is how to make a proper British Scrambled Egg based on Gordon Ramsay’s Recipe. I know there are many ways to make scrambled eggs but this is my favourite way!

Ingredients

  • 3 Eggs
  • A teaspoon of Crème Fraiche
  • Salt
  • Pepper
  • Butter

Instructions

  1. Pour your eggs into a non-stick skillet unbeaten. You do not want to beat your eggs before cooking as you are unnecessarily breaking it down.
  2. Insert a generous helping of butter to increase the velvety texture to the eggs.
  3. Turn on the heat and start stirring everything up. Eggs are very simple to cook but hard to master as they cook rather quickly. Thus, you’d want to take your pan on and off the heat frequently. When the pan is off heat, due to the low temperature eggs cook at, the egg is still cooking. You wouldn’t want to overcook the egg, making it dry. You also wouldn’t want to undercook it and make it a runny mess. The idea is that you want to cook it until you see some thickness in the egg but you do not want to make it too dry. For a visual reference, you can use the image above.
  4. After you deem the egg cooked, turn of the flame and add Crème Fraiche and seasonings. Then, stir and plate it. The reason behind only adding seasonings towards the end of the cooking is because if you add it before cooking, the eggs leave behind a grey watery substance and you’d want to avoid that.
  5. Serve the eggs with toast, mushrooms or dried cherry tomatoes. A few flakes of parmesan would also go great on top!
Design a site like this with WordPress.com
Get started